
Here’s the secret I tell everyone who's just getting started with their air fryer: when you want to convert a recipe from your oven, just reduce the temperature by 25°F and cut the cooking time by about 20-25%. That's it. This simple rule of thumb is your best friend and the perfect starting point for almost any dish.
Your Quick Start Guide To Oven To Air Fryer Conversion
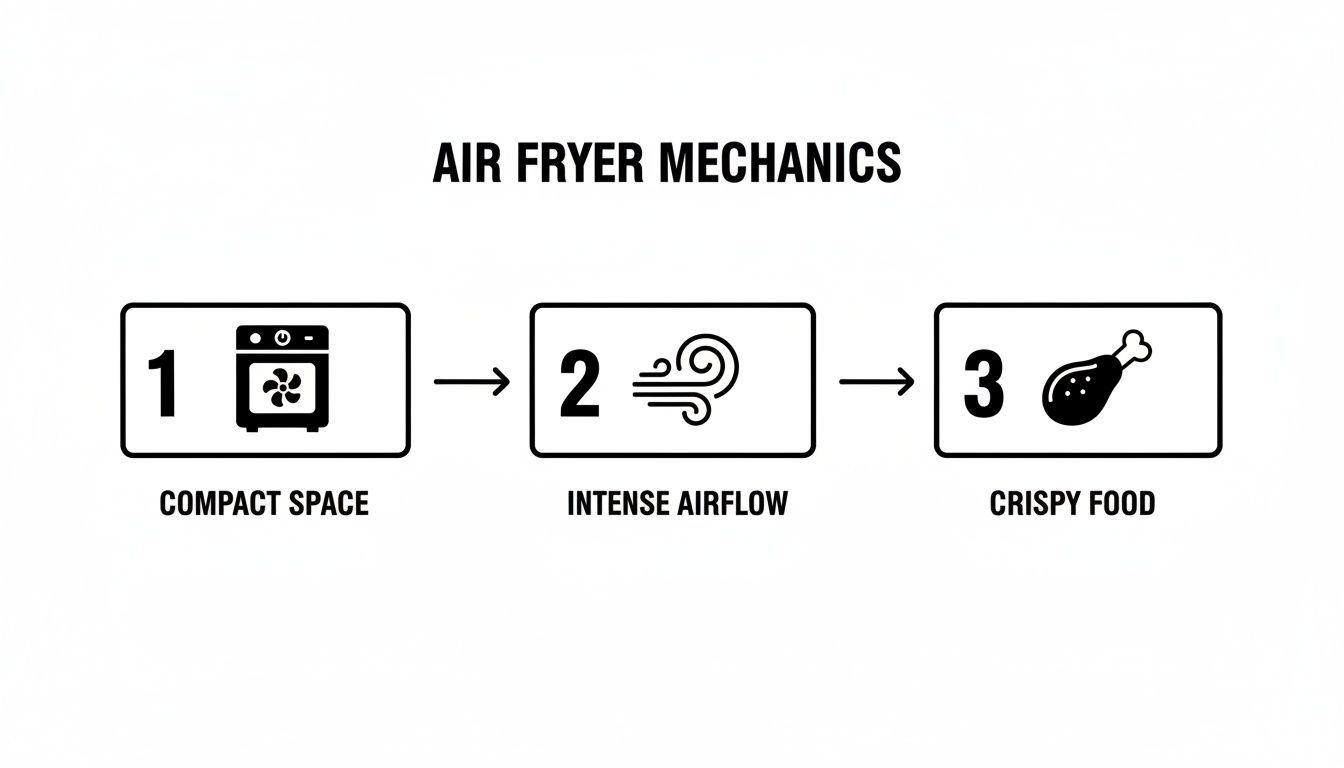
Thinking about how to convert recipes isn't about doing complicated math. It's really about understanding what makes an air fryer so different. Essentially, it's a small, powerful convection oven that circulates hot air with incredible speed and intensity.
This super-charged environment is why food cooks so much faster and gets that signature crispy finish that a traditional oven just can't replicate.

This shift from oven to air fryer is more than just a passing fad; it's a real change in how we cook at home. The proof is in the numbers. The global air fryer market was valued at roughly USD 1.28 billion in 2023 and is expected to balloon to USD 2.07 billion by 2030. This incredible growth, highlighted in the full market research on air fryer growth, shows just how many people are making these appliances a kitchen staple.
The Basic Conversion Formula
While the "-25°F and -20% time" guideline is fantastic for most things, think of it as your foundation, not the final word. The real key to success is to start with that calculation and then check on your food a little early. Every air fryer is slightly different, so your first time making a new recipe is always a bit of an experiment.
My personal rule of thumb is to check for doneness at the 75% mark of the new calculated time. So, if a 20-minute oven recipe becomes a 16-minute air fryer recipe, I’m peeking in around the 12-minute mark. This simple habit has saved me from countless burnt meals!
General Oven to Air Fryer Conversion Rules
To make things even easier, here's a quick-reference chart with some common conversions. This is the perfect cheat sheet to save on your phone or stick on the fridge for those moments you need a fast answer.
| Oven Temperature | Suggested Air Fryer Temperature | Oven Time | Suggested Air Fryer Time |
|---|---|---|---|
| 350°F (175°C) | 325°F (160°C) | 20 minutes | 15-16 minutes |
| 375°F (190°C) | 350°F (175°C) | 30 minutes | 22-24 minutes |
| 400°F (200°C) | 375°F (190°C) | 45 minutes | 34-36 minutes |
| 425°F (220°C) | 400°F (200°C) | 15 minutes | 11-12 minutes |
With this guide, you can confidently start tackling your favorite oven-baked recipes, from roasted vegetables to frozen snacks. The more you use it, the more you'll build your own intuition.
Once you have this foundation, you can move beyond basic recipes and start experimenting. For more inspiration, check out the other helpful articles on our blog.
So, Why Does an Air Fryer Cook So Differently?
Before you can nail converting oven recipes, you need to get one thing straight: your air fryer is not a tiny oven. That's the biggest mistake people make. It's really a super-charged convection machine, built for speed and power.
The secret sauce is a combination of two things: a really small cooking space and a very powerful fan. A regular oven gently heats the air around your food, but an air fryer blasts superheated air directly at it from every angle imaginable.
This intense, focused heat is what gives food that incredible crispiness so fast. Think of it less like baking and more like "dry-frying."
The Small Space Advantage
The compact size of an air fryer basket is actually its biggest strength. It takes a ton of time and energy to heat up the huge cavern of a conventional oven. An air fryer? It's ready to go in minutes, and some don't even need preheating.
This is a total game-changer. The small, concentrated cooking area means the machine holds its temperature incredibly well, which leads to quicker cook times and more consistent results—as long as you don't cram too much in there. This is probably the most important thing to remember when you're converting an oven recipe.
That Fan is Everything (Hello, Maillard Reaction!)
The other part of the equation is that powerful fan. It whips hot air around much faster than even a good convection oven, stripping moisture from the surface of your food in record time.
This quick dehydration process is the key to getting a perfectly crispy finish. It also kick-starts the Maillard reaction, which is the science-y term for the browning process that gives roasted, fried, and grilled foods their amazing flavor. It’s exactly why air-fried chicken wings get that crackly skin and roasted veggies get beautifully charred in half the time.
Here's a good way to think about it: You can dry your hands by just holding them in a warm room, but it's way faster under a high-powered hand dryer. The air fryer is that hand dryer. Your oven is the warm room.
This efficiency is a huge reason these things are everywhere now. People are switching from ovens to air fryers for health and energy savings. Research shows their popularity exploded because they cook traditionally fried or baked foods with way less fat. For anyone who loves a good snack, that means making fries with up to 75% less oil that cook 75% faster than in an oven. Size matters, too; compact units under 4 liters dominated about 48.4% of the market in 2023—the perfect size for a small family. You can dig into more air fryer market trends on grandviewresearch.com if you're curious.
What This Means For Your Food
Once you understand how it works, the adjustments you need to make for your recipes start to make perfect sense.
- It Cooks Way Faster: That concentrated, circulating heat means your food will be done much, much sooner. Cutting the time is the first rule of air frying.
- It Gets Extra Crispy: The intense airflow is a master at creating crunchy, crispy textures that are a lot like deep-frying, but without all the oil.
- It Can Burn Easily: But here’s the catch. That same intensity can scorch the outside of your food before the inside is even cooked, especially with sugary marinades or delicate breadings. That’s why you almost always need to lower the temperature, too.
Getting a feel for these principles is what will take you from just following a formula to really understanding how to adapt any oven recipe. It's how you learn to eyeball things and make smart adjustments on the fly for great results every time.
How To Convert Recipes For Different Foods
That general rule of thumb—drop the temperature by 25°F and cut the time by 20%—is a fantastic starting point. It gets you in the ballpark. But as you start cooking, you'll quickly discover that what works for crispy chicken wings might not be ideal for delicate salmon or a batch of muffins.
This is where you move from just following a rule to really cooking. The secret lies in understanding how different foods react to the intense, circulating heat of an air fryer. It's all about their density, moisture, and size.
Think of it this way: an air fryer is a small, super-powered convection oven. Its compact chamber and powerful fan are what create that signature crispiness so much faster than a conventional oven.
This setup is the engine behind those rapid, golden-brown results that a regular oven just can't replicate without a lot more time and oil.
Mastering Proteins Like Chicken and Fish
Proteins are where an air fryer really shows off, creating that perfect crispy-on-the-outside, juicy-on-the-inside texture. For things like chicken thighs, wings, and pork chops, the standard conversion formula works like a charm. The intense airflow renders fat beautifully, giving you that crackling skin everyone loves.
But for leaner proteins like salmon fillets or boneless chicken breasts, you have to be more careful. That direct, powerful heat can dry them out in a hurry. I’ve found it’s better to be more aggressive with the temperature drop—try reducing it by 30-40°F. And definitely start checking for doneness earlier than the 20% time reduction would suggest.
A light coating of oil is non-negotiable here. It helps the surface brown nicely and, most importantly, keeps the protein from sticking and drying out before the inside is cooked through.
Roasting Vegetables to Perfection
Vegetables can be a little tricky. Because of their high water content, they can easily steam instead of roast if you overcrowd the basket. The most important rule? Give them space. Cook in batches if you have to—it’s always worth the extra few minutes.
Here’s how I approach different types of veggies:
- Hard, Dense Veggies: For potatoes, carrots, and Brussels sprouts, stick close to the standard conversion. The high heat is perfect for softening the inside while crisping up the exterior.
- Softer, High-Moisture Veggies: With zucchini, bell peppers, and asparagus, a slightly higher temperature and shorter cook time often work better. This sears the outside quickly before they have a chance to get mushy.
- Leafy Greens: Making kale chips? Use a very low temperature, around 300°F, for just 3-5 minutes. You’ll probably need a small metal rack to hold them down so they don’t fly around in the fan’s powerful current.
The key takeaway for vegetables is airflow. If the hot air can't circulate around each piece, you'll end up steaming them. Always toss them with a bit of oil and spread them in a single, even layer for the best results.
Handling Frozen Convenience Foods
This is what most people try first, and for good reason—air fryers are practically made for this stuff. For frozen fries, onion rings, or chicken nuggets, you can pretty much ignore the oven instructions on the package.
A great starting point for most frozen snacks is 380-400°F for 10-15 minutes. Since they cook so fast, shaking the basket is mandatory. I make a habit of shaking it at least twice during the cook time to make sure every single piece gets that even, golden crunch.
Don’t be shy about pulling the basket out to check on things. An air fryer loses very little heat when you open it, so frequent peeks won't mess up your food.
A Special Note on Baked Goods
I'll be honest: baking in an air fryer is an advanced skill that requires some trial and error. The main challenge is the powerful, top-down heat source, which loves to burn the tops of cookies, muffins, and small cakes before the center is fully cooked.
To get it right, you'll need to make a few key adjustments:
- Lower the Temperature Significantly: Drop the recipe's temperature by at least 30-50°F. This gives the inside a fighting chance to cook before the top gets too dark.
- Use Air-Fryer-Safe Bakeware: You'll need smaller pans or silicone molds that fit inside your basket while still leaving room for air to circulate around the sides.
- Cover with Foil: If you notice the top browning way too fast, loosely tent a small piece of aluminum foil over it for the second half of the cooking time.
Even something simple can be amazing. To get a feel for timing and temperature, you can learn how to toast a bagel in the air fryer for a perfectly crisp finish. It's a great, low-stakes way to practice.
Food-Specific Conversion Cheat Sheet
To make things even easier, I've put together this quick-reference table. Think of these as proven starting points, not rigid rules. Your specific air fryer model and the size of your food will always play a role, so be ready to adjust.
| Food Category | Temperature Adjustment | Time Adjustment | Key Tips |
|---|---|---|---|
| Vegetables | Reduce by 25°F | Reduce by 20-25% | Don't overcrowd the basket! Cook in a single layer for true roasting instead of steaming. |
| Proteins | Reduce by 25-40°F | Reduce by 20%, check early | Use a bit of oil. For lean cuts like fish, use a more significant temperature drop. |
| Frozen Snacks | Increase to 380-400°F | Reduce by 25-50% | Shake the basket frequently (at least 2-3 times) for maximum, even crispiness. |
| Baked Goods | Reduce by 30-50°F | Reduce by 20%, check often | Use air fryer-safe pans and tent with foil if the top browns too quickly. |
By applying these food-specific strategies, you'll move beyond the basic formula. You'll start making intuitive, expert-level adjustments for any recipe you want to tackle, turning your air fryer into an even more versatile kitchen powerhouse.
Fine-Tuning Your Technique for Perfect Air Fryer Results
Getting the basic temperature and time conversions down is a great start, but the real secret to consistently amazing air-fried food lies in the details. These are the little habits and bits of know-how that take your cooking from "good" to "unbelievably crispy and delicious." It's less about the math and more about understanding how to work with the unique, powerful heat of an air fryer.
Think of it this way: the intense, circulating air is your number one tool. If you block that airflow, you're not really air frying anymore—you're just steaming your food. That's why managing your space, oil, and heat cycles is so critical.
Don't Crowd the Basket
This is, without a doubt, the cardinal sin of air frying. We've all been tempted to just dump everything in at once to save time, but overcrowding is the fastest path to soggy, unevenly cooked disappointment. That superheated air needs to swirl around every surface of your food to work its magic.
When the basket is packed too tightly, moisture gets trapped, and your food ends up steaming in its own condensation. You will always get better results cooking in two smaller, separate batches than one big, crowded one. The golden rule is to always leave space between items. They shouldn't be touching.
Remember to Shake, Rattle, and Flip
Most air fryers blast heat from a powerful element at the top. This means whatever is closest to that heat source is going to cook and brown much faster. To get that beautiful, even color and crispiness, you have to get in there and mix things up midway through.
Here's how I handle it:
- For small stuff like french fries, tater tots, or chopped veggies, I pull the basket out and give it a really vigorous shake at least once during the cook time, sometimes twice.
- For bigger pieces like chicken thighs, pork chops, or salmon fillets, I use tongs to physically flip each piece over at the halfway point.
This simple step ensures all sides of your food get their fair share of direct heat, which is the key to that perfect, all-over golden-brown finish.
I’ve learned from experience that a "shake" is more than a gentle nudge. A good, firm shake that actually tosses the food around is what separates perfectly crisp fries from a batch that's half-burnt and half-soggy. Don't be timid!
A Little Bit of Oil Goes a Long Way
Air frying is famous for using a fraction of the oil of other methods, but that doesn't mean you should go completely oil-free. A small amount of oil is crucial for texture and browning. It acts as a heat conductor, helps kickstart the delicious Maillard reaction (that's the browning process), and keeps food from drying out under the intense airflow.
For most things, a light spritz from an oil mister or simply tossing your ingredients in a teaspoon of oil is all it takes. This is especially important for fresh-cut vegetables and lean proteins. You can usually skip the extra oil for pre-fried frozen foods like fries or nuggets since they already contain enough fat to crisp up on their own.
The Great Preheat Debate
To preheat or not to preheat? While it’s true that air fryers get hot incredibly fast—some can preheat in under 2.5 minutes—taking that extra moment can make a world of difference for certain recipes.
- Always preheat for: Baked goods (like muffins or small cakes), dense proteins like steak, or anything you want to get a hard, fast sear on. Starting hot helps these items cook correctly right from the get-go.
- You can skip preheating for: Most frozen snacks, reheating leftovers, or thin vegetables that cook quickly. These items are more forgiving and will cook through just fine as the air fryer comes up to temperature.
Preheating gives you a stable, hot cooking environment the second you slide the basket in. This leads to better textures and more reliable cooking times, making your oven-to-air-fryer conversions that much more successful.
Tackling Common Air Fryer Conversion Problems
Even with the best conversion rules, sometimes things just don't turn out right. Your air fryer model, the exact moisture in your veggies, or the fat content in your chicken can all throw a curveball. But don't get discouraged—most of these little mishaps are easy to fix once you know what to look for.
Think of this as getting to know your specific air fryer's personality. Every machine has its own quirks, and a bit of trial and error is just part of the fun.
The Classic "Burnt Outside, Raw Inside" Dilemma
This is, without a doubt, the most common frustration I hear about. If your food looks perfectly browned (or even burnt) on the outside but is still cold or uncooked in the middle, the reason is almost always the same: your temperature is too high.
The air fryer's powerful fan blasts the surface with intense heat, cooking it much faster than the heat can work its way to the center. It’s a tell-tale sign that your temperature conversion was a bit too aggressive.
The fix is straightforward: lower the heat and extend the cooking time. Instead of the standard 25°F reduction, try dropping the temperature by a full 40°F or even 50°F. This is especially important for dense foods like thick chicken breasts, pork chops, or chunky potato wedges. A lower, gentler heat gives the inside a chance to catch up before the outside gets overdone.
For anything with a sugary marinade or a breaded coating that tends to scorch, here's a pro tip: loosely tent a small piece of foil over the food about halfway through cooking. This acts as a shield, deflecting some of that direct heat and letting everything cook through evenly.
Why Did My Food Come Out Soggy?
You were dreaming of that signature air fryer crunch, but you ended up with something limp and steamy. This disappointing result rarely has to do with temperature. Instead, it’s all about moisture and airflow. Soggy food means steam got trapped inside the basket.
This usually happens for two main reasons:
- You overcrowded the basket. This is the number one culprit. When food is crammed in, the hot air can't circulate freely around every surface to wick away moisture. Instead of frying, your food just steams itself. The only solution is to cook in smaller batches, leaving plenty of space between each piece.
- There was too much water on the food. Did you really, truly pat those chicken wings dry? Or blot the water off your vegetables after washing them? Any excess moisture on the surface of your food will immediately turn to steam, creating a barrier that prevents a crispy crust from ever forming. Always give your food a good pat-down with a paper towel before it goes in.
My rule of thumb is this: if I can't see the bottom of the basket through the gaps in the food, I've put too much in. It’s always better to cook two fast, crispy batches than one slow, soggy one.
What to Do When Your Air Fryer Starts Smoking
Seeing white smoke puffing out of your air fryer can be a little alarming, but it’s usually nothing to panic about. It's typically just grease from your food dripping down onto the hot drawer or heating element below. Fatty foods like bacon, burgers, and sausages are notorious for this.
There's a genius little trick to stop this from happening: pour a small amount of water into the drawer underneath the basket. You only need a couple of tablespoons. The water catches any rendering fat, cooling it instantly so it can't burn and smoke. This one tip is a game-changer for cooking high-fat foods.
Also, check what kind of oil you're using. If you're using an oil with a low smoke point (like some extra virgin olive oils) at high temperatures, the oil itself can burn. For air frying, it's best to stick with high-smoke-point oils like avocado, grapeseed, or canola oil.
Your Top Oven-To-Air-Fryer Questions, Answered
Even when you've got the basic conversion rules down, you’ll still run into little questions that pop up mid-recipe. It’s completely normal. Nailing those small details is what separates a good meal from a great one, and it's the final step to feeling like you can convert anything with total confidence.
I’ve put together this FAQ to tackle those common sticking points. Think of it as your go-to guide for those "what if" moments, giving you the quick answers you need to cook like a pro.
Can I Use Aluminum Foil Or Parchment Paper In My Air Fryer?
Yes, absolutely! But you have to be smart about it. The golden rule is to never block the airflow. Your air fryer works by circulating hot air, and if you cut that off, you'll end up with soggy, unevenly cooked food.
Here’s how to use them safely:
- Go for Perforated Liners: If you're using parchment, grab the kind with pre-punched holes. If you don't have any, just poke a few holes in a regular sheet yourself.
- Make a Foil "Sling": With foil, I like to create a little tray or "sling" that's smaller than the basket. This makes it a breeze to lift out delicate things like fish while still letting air circulate around the edges.
- Always Weigh It Down: This is a huge safety tip. Never, ever toss a loose piece of foil or parchment into an air fryer while it's preheating. The fan is powerful enough to suck it right into the heating element, which is a serious fire hazard. Make sure food is sitting on top to hold it down.
How Do I Convert A Convection Oven Recipe To An Air Fryer?
Good news—this is one of the easiest conversions you can do. At its core, an air fryer is just a small, really powerful convection oven. The technology is the same, so the changes are minor.
For most recipes, you don’t even need to adjust the temperature. A fantastic starting point is to use the exact same temperature the convection recipe calls for, but knock the cooking time down by about 20%. Because the air fryer is so compact and has a more aggressive fan, it just cooks things faster.
As always, start peeking at your food a few minutes before you think it'll be done.
Do Liquid Ingredients Need To Be Adjusted?
This one really depends on what you're making. For something like a marinade on chicken or steak, you can usually stick with the original amount. Just be warned that any extra marinade that drips down can start to smoke, especially if it's full of sugar.
When it comes to baked goods, things are a little different.
- For cakes or muffins, stick to the liquid amounts in the recipe.
- You'll need smaller pans that fit comfortably inside your basket, leaving space around the sides for air to move.
- Avoid super thin batters, like for tempura. Wet, runny batter will just drip right through the basket holes before it has a chance to set. Stick with thicker batters or breaded coatings instead.
What If My Air Fryer Lacks A Specific Temperature Setting?
This happens all the time. Most air fryers adjust temperature in 10 or even 25-degree increments. So, what do you do if your recipe calls for 365°F, but your machine only has 360°F and 370°F?
The safest bet is to always round down. It's far better to choose the slightly lower temperature (360°F) and add a minute or two of cook time than to risk scorching the outside of your food while the inside is still raw.
Start checking for doneness at the new, slightly reduced time, and then just add more time in short 1-2 minute bursts until it’s perfect. For more tips from people who live and breathe this stuff, check out the experiences shared by our team of recipe authors. They've tested more conversions than you can count.
At airfryersnackideas.com, we're obsessed with helping you make the most of your air fryer. Explore our site for hundreds of tested recipes and tips to make every snack a success. Visit us at https://airfryersnackideas.com to find your next favorite treat.