
Having a good air fryer cooking times chart is the secret weapon for getting that perfect crispy texture every single time. As a starting point, plan on cooking frozen french fries for 15-18 minutes at 400°F and fresh chicken wings for 20-25 minutes at 380°F. Just don't forget the golden rule: shake the basket halfway through.
This guide gives you the quick-reference times you need to start making delicious snacks right away.
Why An Air Fryer Cooking Chart Is Essential
At its heart, an air fryer is a small, powerful convection oven. It blasts superheated air around your food at high speed, cooking things 20-30% faster than your regular oven. That’s how a 45-minute bake for frozen fries turns into a 15-minute snack session. This incredible efficiency is exactly why these little machines have become so popular.
For a quick visual guide, this cheat sheet covers some of the most common air fryer snacks.
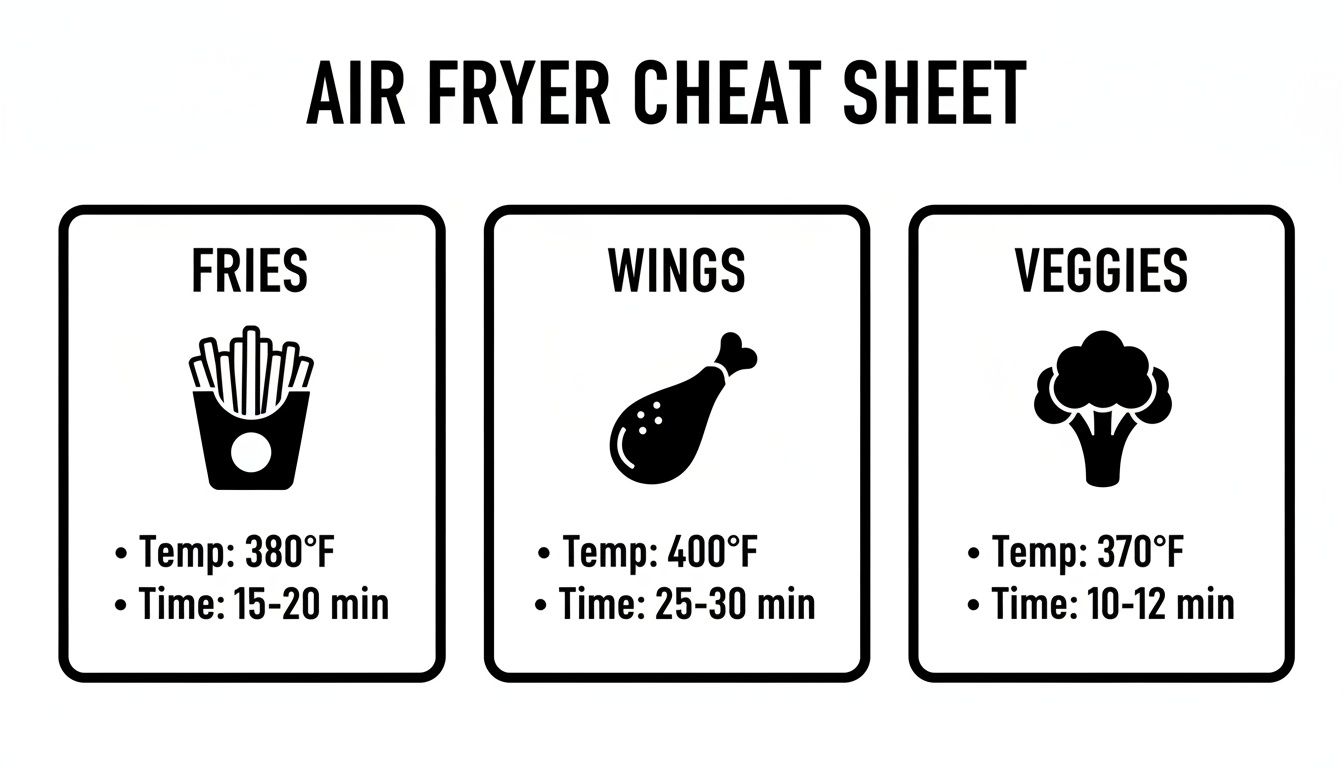
This graphic gives you a solid starting point for the time and temperature ranges for popular foods like fries, wings, and veggies. Think of it as your launchpad for experimenting.
For those who love a quick lookup, here's a handy table with times and temperatures for the most common air-fried snacks.
Quick Reference Air Fryer Cooking Times
| Food Item | Temperature (°F) | Cooking Time (Minutes) | Key Tips (e.g., Shake Halfway) |
|---|---|---|---|
| Frozen French Fries | 400°F | 15-18 | Shake basket halfway through. |
| Fresh Chicken Wings | 380°F | 20-25 | Flip wings halfway for even crisping. |
| Frozen Mozzarella Sticks | 360°F | 6-8 | Watch closely; don't let them burst. |
| Fresh Broccoli Florets | 375°F | 10-12 | Toss with oil and seasoning first. |
| Frozen Chicken Nuggets | 400°F | 10-12 | Shake basket once during cooking. |
Remember, this chart is a fantastic starting point, but your specific air fryer model might need slight adjustments.
The Rise of Air Frying
The desire for fast, healthier cooking options is huge. Air fryer production is expected to jump from 18.95 million units in 2018 to a staggering 99.33 million by 2027. This boom is all thanks to home cooks who want convenience without giving up on quality. With millions of new people firing up their air fryers, a reliable cooking chart is more important than ever.
Knowing the basics is the first step. But to really master your air fryer, you need to understand how things like your specific model, its wattage, and even how you arrange the food in the basket can change the outcome. Once you get a feel for these variables, you can adapt any recipe and get consistently great results. For more in-depth tips and creative snack ideas, feel free to check out our latest articles and guides.
Getting to Know Your Air Fryer for Predictable Results
That air fryer cooking times chart you printed? It's a fantastic starting point, but think of it more as a friendly suggestion than a hard-and-fast rule. The truth is, no two air fryers are exactly alike. Getting a feel for your own machine is the real secret to moving from good results to great ones. The appliance's size, its power (wattage), and even its basic design all have a say in how your food turns out.
It’s a bit like ovens—some just run hotter than others. A compact, 1200-watt air fryer with a little 3-quart basket is going to cook things way faster than a big 1700-watt, 8-quart oven-style model. The smaller space means more concentrated, intense heat. You'll probably find yourself needing to shave a minute or two off most recipes.
The Big Three: What Really Affects Cooking Time
Once you get a handle on these key factors, you'll be able to adapt any recipe or chart to your specific machine like a pro.
- Wattage: More power usually means more speed. High-wattage models (1500W-1800W) preheat in a flash and cook quicker. If you have a lower-wattage unit (800W-1200W), just plan on adding an extra minute or two to the cook time.
- Model Type: The classic basket-style air fryers are brilliant at circulating air in a tight space, which means they're super-efficient for smaller batches. The larger, oven-style models are great for cooking on multiple racks, but that extra space sometimes means things take a bit longer to crisp up.
- Batch Size: This is the number one mistake I see new air fryer owners make. Piling food into the basket is a recipe for soggy, steamed snacks. You have to leave room for the hot air to work its magic.
Pro Tip: If you want that perfect, crispy crunch, always cook in a single layer. It might feel tedious to cook in batches, but I promise the results are worth it. Spreading things out lets the hot air hit every single surface, which is how you get that beautiful golden-brown finish.
Simple Habits for Perfect Air-Fried Snacks
Your technique matters just as much as the machine's specs. A few small tweaks to your routine can make a world of difference in the final texture and taste of your food. Master these, and you'll be using those cooking charts with total confidence.
1. Don't Skip the Preheat
Always give your air fryer 3-5 minutes to get hot before you put any food in. That initial blast of heat is what kickstarts the crisping process and is absolutely essential for things like fries or chicken wings.
2. A Little Oil Goes a Long Way
Yes, it's an "air" fryer, but a tiny bit of oil is your best friend. A light spritz from a mister or tossing your food in just a teaspoon of oil makes a massive difference. It's the key to getting that satisfying, crunchy finish on fresh veggies or homemade fries and keeps them from drying out.
3. Give It a Shake (or a Flip)
Food doesn't move on its own in there. To make sure everything cooks evenly, you’ve got to shake the basket or use tongs to flip your food halfway through. This simple step ensures every side gets its turn in the direct path of the hot, circulating air.
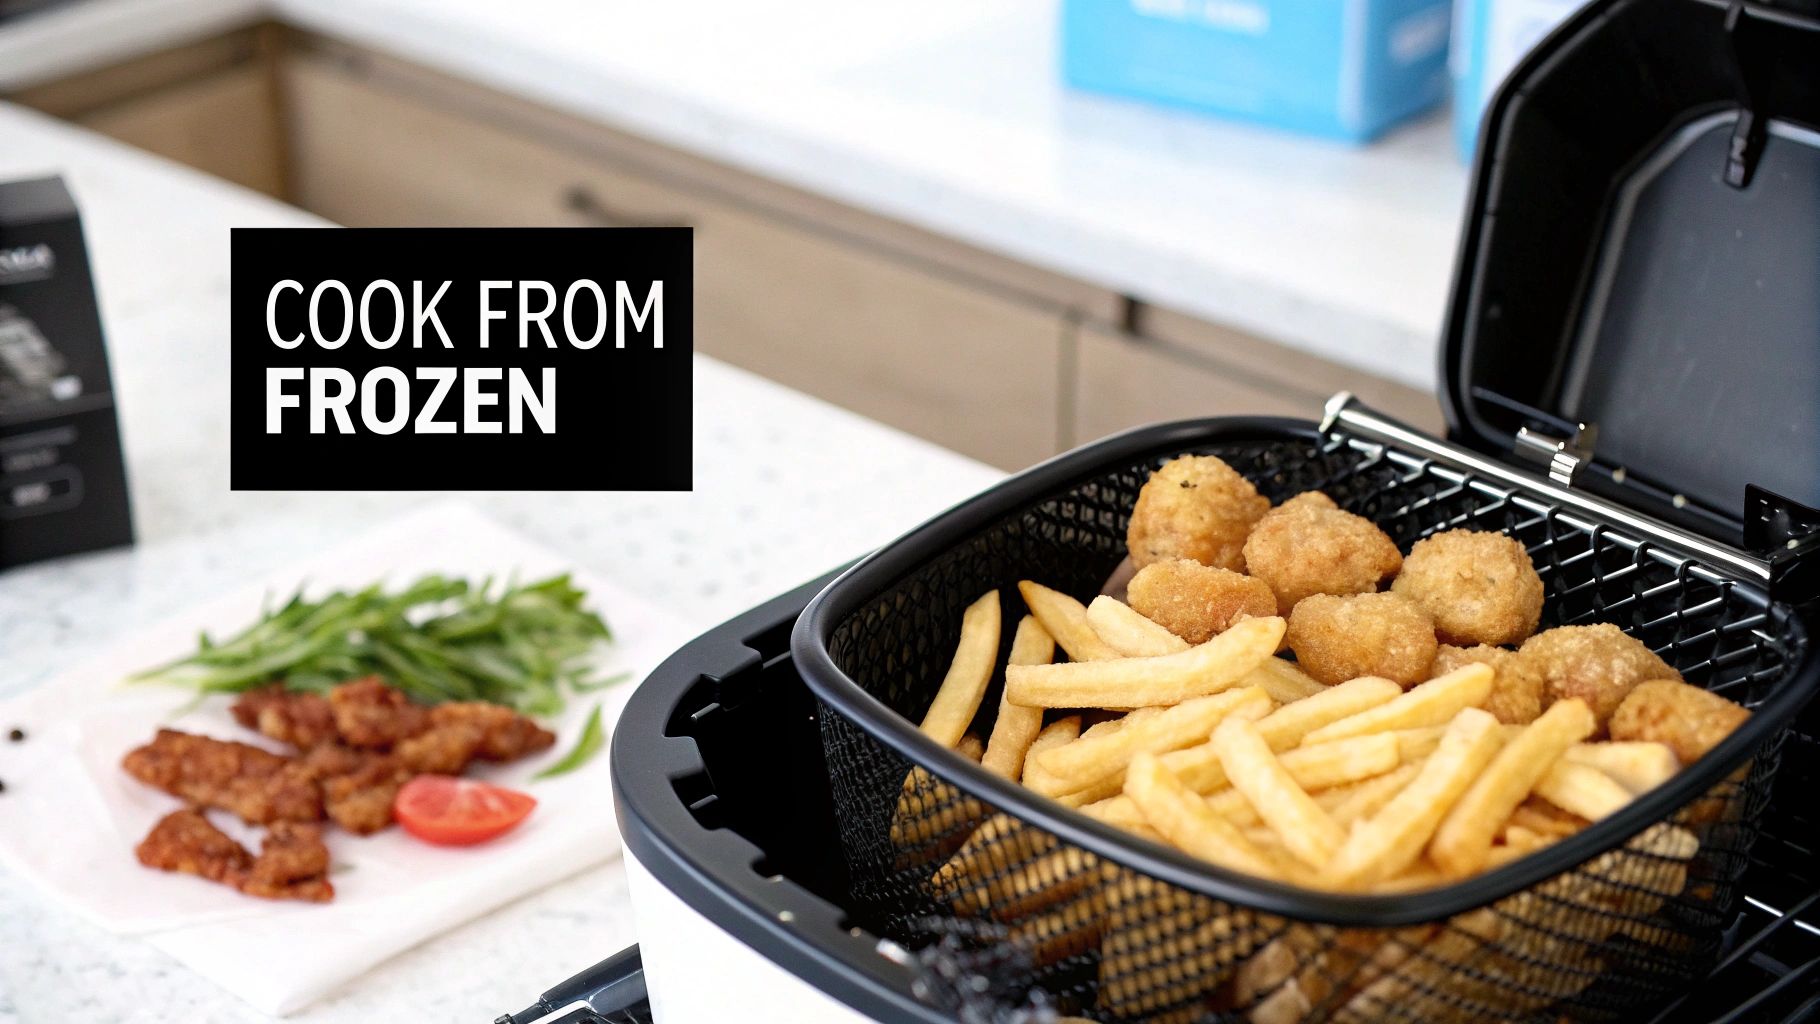
Air Fryer Cooking Times for Frozen Foods
Let's be honest: the freezer aisle is an air fryer's best friend. It’s your secret weapon for getting crispy, crave-worthy snacks on the table fast, without all the mess and oil of deep-frying. Using a reliable air fryer cooking times chart is the key to turning those icy blocks into perfectly golden bites. And the best part? Almost everything is cooked directly from frozen—no thawing needed.
The magic is in how the air fryer's powerful, circulating hot air cooks the food from the inside out while crisping up the exterior in record time. For instance, a batch of standard frozen french fries hits that perfect crunch at 400°F (200°C) in about 15-20 minutes. This incredible efficiency is exactly why so many of us now turn to the air fryer for quick snacks and easy weeknight sides.
This chart is your new go-to reference for all those freezer-aisle favorites. We've compiled the most common frozen foods and the ideal times and temperatures to get them just right.
Comprehensive Cooking Times for Frozen Foods
| Frozen Food | Temperature (°F) | Time (Minutes) | Instructions (Shake, Flip, etc.) |
|---|---|---|---|
| French Fries (Thin-Cut) | 400°F | 12-15 | Shake basket halfway through. |
| Crinkle-Cut/Steak Fries | 380°F | 18-22 | Flip or shake halfway through. |
| Tater Tots | 400°F | 15-18 | Shake vigorously halfway through. |
| Onion Rings (Breaded) | 400°F | 8-10 | Shake basket halfway through. |
| Mozzarella Sticks | 360°F | 6-8 | Cook until golden, just before cheese oozes. |
| Jalapeño Poppers | 375°F | 10-12 | Flip halfway for even browning. |
| Chicken Nuggets | 400°F | 10-12 | Flip halfway through. |
| Chicken Tenders (Breaded) | 400°F | 12-15 | Flip halfway through. |
| Fish Sticks | 380°F | 12-15 | Flip carefully halfway through. |
| Popcorn Shrimp | 400°F | 8-10 | Shake basket halfway through. |
| Pizza Rolls | 380°F | 6-8 | Shake halfway; let cool before eating! |
| Bagels (Frozen) | 350°F | 4-5 | Place cut-side up. |
Keep in mind that these are fantastic starting points. Your specific air fryer model and how much you pack into the basket can affect cook times, so don't be afraid to add a minute or two if needed.
Tips for Perfect Frozen Potato Snacks
Frozen potatoes are probably the #1 reason people fall in love with their air fryers. Whether you're making shoestring fries or chunky tater tots, the results are just so much better than what you get from a regular oven. The trick is always high heat and shaking the basket to get every surface crispy.
- French Fries (Thin-Cut): Set your machine to 400°F (200°C) and cook for 12-15 minutes. A vigorous shake halfway through is non-negotiable!
- Tater Tots or Potato Puffs: These need 15-18 minutes at 400°F (200°C). Shaking is essential to stop them from clumping into one giant tot.
- Crinkle-Cut or Steak Fries: Because they're thicker, they need a bit more time. Go for 18-22 minutes at 380°F (190°C), flipping them over at the midpoint.
The golden rule for all of these is to arrange them in a single layer. If you overcrowd the basket, you'll end up trapping steam, and steam is the mortal enemy of crispiness.
Crowd-Pleasing Appetizers and Sides
Your air fryer is a total game-changer for turning frozen appetizers into party-ready snacks in just a few minutes. Many of these snacks have cheese or delicate breading, so keep a close eye on them near the end to prevent a cheesy explosion or a burnt crust.
One of the biggest mistakes I see people make is cooking all frozen snacks at the same temperature. A delicate mozzarella stick will burn and burst at the same temp that a hearty chicken nugget needs to get crispy. Always start with the lower end of the recommended time and peek in to add more if necessary.
Here are my go-to settings for the most popular frozen apps:
- Mozzarella Sticks: Cook them at 360°F (180°C) for just 6-8 minutes. You want to pull them out the second they look golden, right before the cheese makes a break for it. That's how you get the perfect cheese pull.
- Onion Rings: These get beautifully crisp in 8-10 minutes at 400°F (200°C). Give them a good toss halfway through so they cook evenly.
- Jalapeño Poppers: These usually take 10-12 minutes at 375°F (190°C) to get hot and bubbly on the inside and golden on the outside.
- Bagels: You can get a perfectly toasted bagel straight from the freezer. We've got a whole guide on this, so you can learn more about how to make a bagel in the air fryer if you're curious.
Meats and Fish from the Freezer
From a quick meal for the kids to an easy protein to top a salad, the air fryer handles frozen meats and fish like a champ. The intense heat cooks them through safely while giving them that satisfyingly crunchy coating. Best of all, there's no need to add any extra oil to items that are already breaded, like nuggets or fish sticks.
- Chicken Nuggets or Tenders: Cook these at 400°F (200°C) for 10-12 minutes, remembering to flip them over at the halfway mark for even crisping.
- Fish Sticks or Fillets: These are a bit more delicate. Set your air fryer to 380°F (190°C) and cook for 12-15 minutes, flipping them gently once.
- Popcorn Shrimp: Small items like these cook in a flash. They only need 8-10 minutes at 400°F (200°C), with a good shake midway through the cook time.
Remember, every air fryer is a little different. Think of these times as solid guidelines, not strict rules. The size of your food and your specific model might mean you need to adjust things slightly, so always check for doneness before you dig in.
Cooking Times for Fresh Vegetables and Proteins
Sure, frozen snacks are great in a pinch, but your air fryer really comes alive when you’re cooking fresh. This is where you move from convenient snacks to creating genuinely healthy, flavorful meals that taste incredible but take almost no time to prepare. Having a reliable air fryer cooking times chart for fresh ingredients transforms your machine from a gadget into a daily go-to for quick dinners and amazing side dishes.
The sheer speed of air frying fresh food is a huge part of its appeal. Health trends and the demand for faster cooking have driven the market in North America to a dominant 35-37.6% share. Think about it: fresh sweet potato fries are crispy and perfect in 15-20 minutes at 380°F, while a conventional oven would take nearly an hour. That kind of efficiency is exactly why so many people have made the air fryer a permanent fixture on their countertop. If you're interested in market trends, you can read more about the latest air fryer industry analysis.
Mastering Fresh Vegetables
Want to know the secret to perfectly roasted veggies in the air fryer? It’s simple: a little bit of oil and plenty of space. Tossing your vegetables in a teaspoon or two of your favorite oil is what helps them get that beautiful caramelization and crispiness without just drying out.
- Broccoli Florets: Toss with oil, salt, and maybe some garlic powder, then cook at 375°F for 10-12 minutes. Make sure to shake the basket about halfway through so they brown on all sides.
- Brussels Sprouts: I like to halve these before cooking them at 380°F for 15-18 minutes. A mid-cook shake is non-negotiable here. For a next-level touch, toss them with a balsamic glaze right after they come out.
- Asparagus Spears: These are incredibly fast! Set your air fryer to 400°F for just 6-8 minutes. If you have really thick spears, you might need an extra minute.
- Bell Peppers and Onions: Sliced peppers and onions cook down beautifully at 380°F for 12-15 minutes with one good shake. They get soft with those slightly charred edges that are perfect for fajitas or as a simple side.
Perfecting Fresh Proteins
When it comes to meat and fish, the air fryer is fantastic for achieving a juicy interior with a crisp, seared exterior. But don't guess—always use a meat thermometer to make sure everything is cooked to a safe internal temperature.
If I can give you one piece of advice for cooking protein, it’s this: let it rest for 5-10 minutes after it comes out of the air fryer. This lets the juices settle back into the meat, making it tender and moist. If you cut into it immediately, all that flavor just runs out onto the plate.
Here are some solid starting points for popular proteins:
1. Chicken Wings (Fresh, Not Frozen)
The key to unbelievably crispy skin is making sure the wings are bone-dry. Pat them thoroughly with a paper towel before you season them. Cook at 380°F for 20-25 minutes, and be sure to flip them halfway through.
2. Salmon Fillets (6 oz)
A little oil and your favorite spices are all you need. Place the salmon skin-side down and cook at 400°F for 7-10 minutes. The exact time depends on how thick your fillet is, so check it with a fork to see if it flakes easily.
3. Steak (1-inch thick Ribeye or Sirloin)
For a beautiful medium-rare, get your air fryer preheated to 400°F and cook for 10-12 minutes, flipping the steak once at the halfway mark. Shave off a minute or two for rare, or add a couple for medium-well. Honestly, an instant-read thermometer is your best friend here.
4. Boneless Turkey Breast (3 lbs)
Season the breast generously and place it in the air fryer at 360°F. This will take about 1 hour, and you’ll want to turn it every 15 minutes to promote even cooking. It's done when the internal temperature hits 165°F.
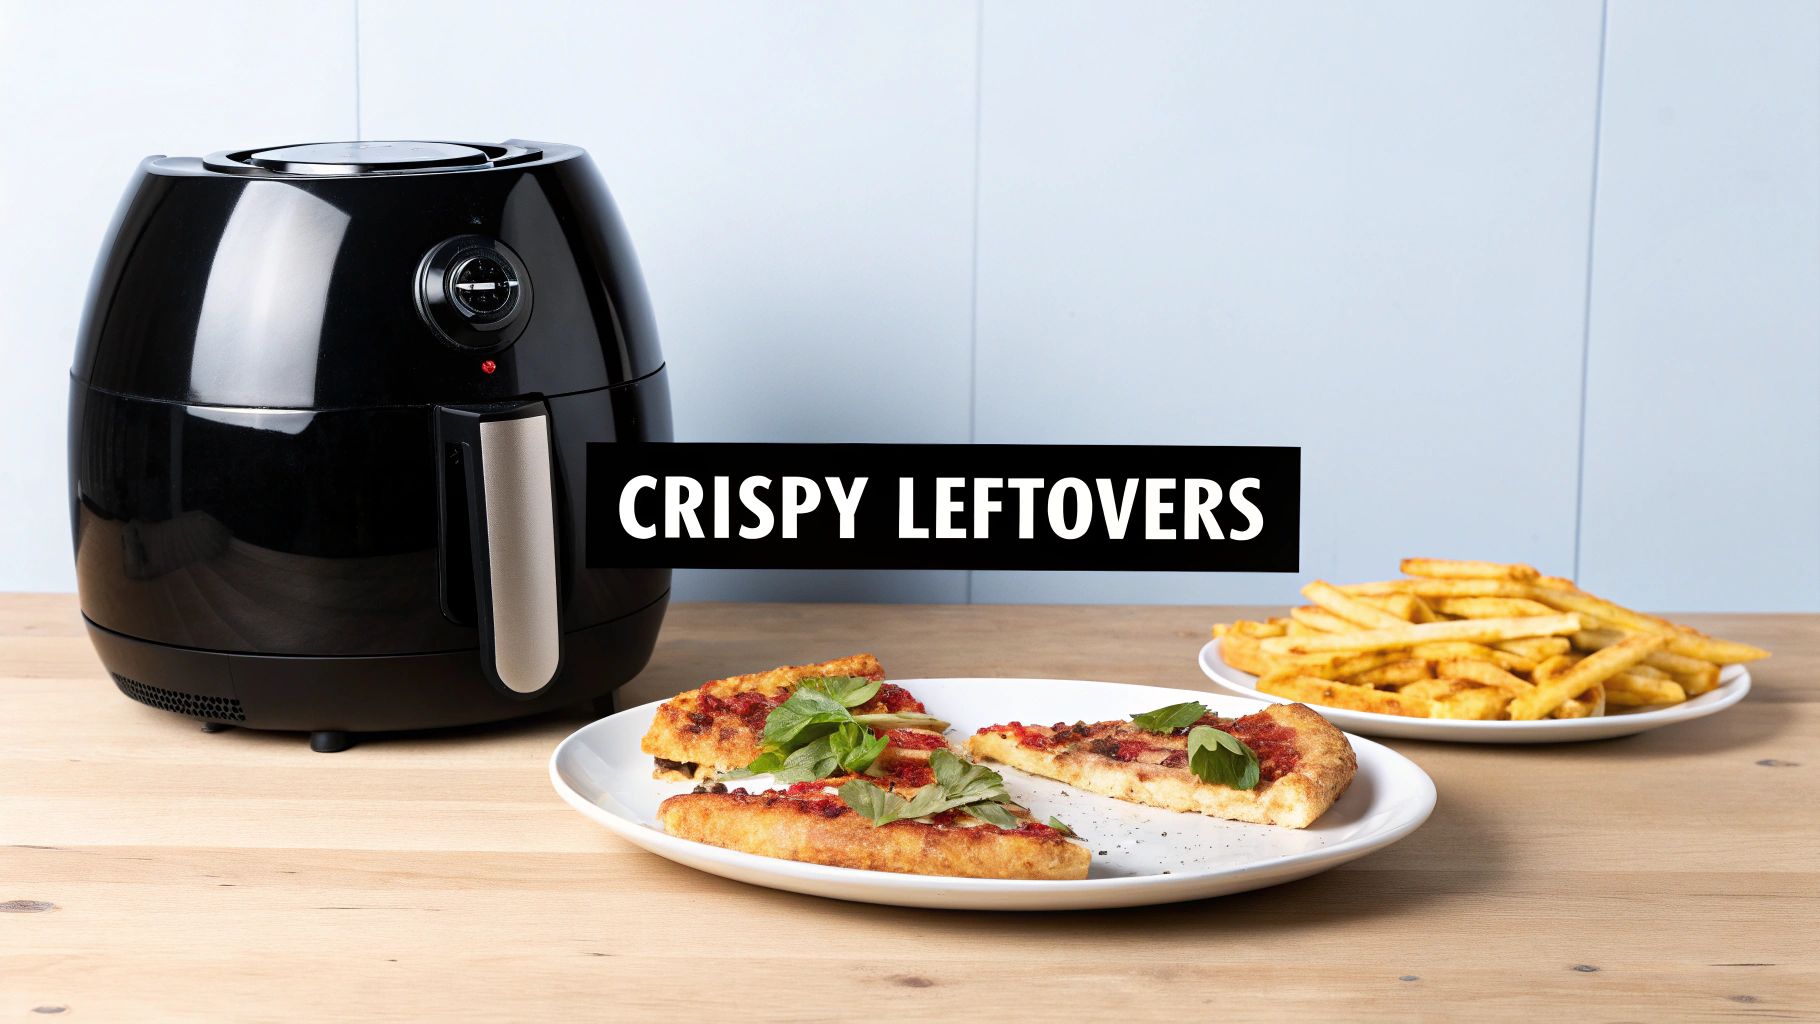
Mastering Reheating for Crispy Leftovers
If there's one area where the air fryer truly shines, it's in resurrecting leftovers. We've all been there: you pop last night's crispy fries or amazing pizza into the microwave, only to pull out a sad, soggy mess. The air fryer changes all of that. Its secret is the circulating hot air that brings food back to its original glory, making it taste like it was just made.
This isn't just magic; it's science. A microwave steams your food from the inside out by agitating water molecules, which is a recipe for rubbery textures. An air fryer, on the other hand, is a tiny convection oven. It envelops your food in dry heat, re-crisping the outside while gently warming the inside. This is why having a handy air fryer cooking times chart specifically for reheating is a total game-changer.
Reheating Times for Common Leftovers
When you're reheating, the goal is different from when you're cooking from scratch. You're just trying to warm the food through and revive its texture, not cook it all over again. This usually means a slightly lower temperature and a much shorter time. As always, arrange everything in a single layer for the best results.
| Leftover Food | Temperature (°F) | Time (Minutes) | Key Tips |
|---|---|---|---|
| Pizza Slices | 350°F | 3-4 | Place slices in a single layer. |
| French Fries | 375°F | 3-5 | Shake halfway through for even crisping. |
| Fried Chicken | 375°F | 4-6 | Flip pieces halfway through. |
| Chicken Wings | 380°F | 4-5 | Shake the basket once during reheating. |
| Steak (Sliced) | 350°F | 2-3 | Watch closely to avoid overcooking. |
| Roasted Vegetables | 375°F | 4-6 | Shake to prevent sticking and promote browning. |
Pro Tip: Never, ever overcrowd the basket when you're reheating. Giving your leftovers space to breathe is the single most important rule for bringing back that crispy, crunchy texture. If you have a lot to warm up, it's far better to do it in two small batches than one big, crowded one.
The Ultimate Pizza Reheating Hack
Honestly, once you reheat pizza in an air fryer, you'll never go back. Say goodbye to the soggy crust from the microwave and skip the long preheat time of a full-sized oven. It's quick, easy, and the results are spectacular.
- Set the Temperature: Get your air fryer going at 350°F (175°C). A minute or two is plenty of preheat time.
- Arrange Slices: Lay one or two slices in the basket. The key is making sure they don't overlap.
- Heat for Perfection: Let them cook for just 3-4 minutes.
What you get is a crust that's perfectly crisp on the bottom, toppings that are sizzling, and cheese that's melted just right. This simple trick completely transforms the leftover pizza experience, making your air fryer an essential tool for fighting food waste and enjoying your favorite meals a second time around.
Making the Recipe Work for Your Air Fryer
Think of an air fryer cooking times chart as a starting point, not a strict set of rules. If you've ever followed a recipe to the letter and ended up with burnt-on-the-outside, cold-on-the-inside snacks, your specific machine is probably the reason. Air fryers aren't all built the same—differences in wattage, size, and even shape can drastically change how your food cooks.
Learning to account for these differences is the secret to mastering your machine. A compact, 1000-watt air fryer will naturally cook faster than a huge, 1800-watt oven-style model. The smaller space heats up and circulates hot air much more intensely.
Wattage: The Power Behind the Crisp
The wattage of your air fryer is a huge piece of the puzzle. It's basically the engine power—higher watts mean it gets hotter, faster, and stays there more consistently.
- Low Wattage (800W – 1200W): These are usually smaller, more budget-friendly models. As a general rule, plan on adding 2-3 minutes to the cooking time you see in most recipes.
- High Wattage (1500W – 1800W+): These are the powerhouses. They heat up in a flash and cook with serious intensity. It's a smart move to shave 1-2 minutes off the recipe time and check on your food a little early.
This is a big reason why flexible cooking guides are so in demand. With the Asia-Pacific region holding a massive 46.22% of the market share, cooks everywhere are trying to get reliable results for their local favorites, from spring rolls to samosas. As more and more models hit the shelves, the need for these adjustable guides only gets bigger. You can explore the full air fryer market research to see just how fast this trend is growing.
Basket vs. Oven: Shape Matters
The physical design of your air fryer also has a major impact. The way hot air moves around is totally different depending on the model's shape, and that affects your final result.
Basket-Style Air Fryers:
This is the classic design most people picture. The deep, round basket is perfect for creating a whirlwind of super-hot air that gets things like french fries and chicken wings incredibly crispy. The downside? That focused heat can cause uneven cooking if you cram too much food in there.
Oven-Style Air Fryers:
These look more like a small countertop convection oven, complete with shelves. They give you a lot more real estate, which is fantastic for cooking bigger batches or different foods at once. Since the cooking chamber is larger, they might take a bit longer to heat up and cook compared to a basket model with the same wattage. For some inspiration on what to cook next, check out our collection of creative air fryer snack ideas.
The Golden Rule of Adjustment: The first time you try any new recipe, set your timer for a few minutes less than what's recommended. You can always add more time, but you can't un-burn your food. Keep a close eye on things during those final minutes to hit that perfect golden-brown sweet spot.
Troubleshooting Common Air Fryer Problems
Even with the best air fryer cooking times chart on hand, you might run into a few snags. Don't worry, it happens to everyone. The great thing is that most air fryer hiccups are really simple to fix once you know what's going on.
Let's walk through some of the most common issues. Getting a handle on these will help you get those perfect, crispy results you're after, every single time. A frequent complaint is soggy food, which almost always comes down to overcrowding the basket. When you pile food in, you're essentially steaming it instead of frying it with hot air.
Why Is My Food Burnt on the Outside but Raw Inside?
Ah, the classic "burnt but raw" dilemma. This is a dead giveaway that your temperature is too high. It's a super common mistake, especially when you're cooking thicker items like chicken breasts or chunky potato wedges. The outside gets blasted with heat and crisps up way too fast, long before the inside has a chance to catch up.
The fix is easy: just dial back the heat and cook it a little longer. For instance, instead of blasting a thick piece of chicken at 400°F for 15 minutes, try 360°F for 20-25 minutes. This lower-and-slower approach lets the heat penetrate evenly, cooking the food all the way through without scorching the surface.
- The Fix: For thicker foods, drop the temperature by about 25-40°F from what the recipe calls for and add a few minutes to the cook time.
- The Tool: An instant-read thermometer is your best friend for this. Seriously, it’s the only surefire way to know your meat is cooked safely without having to cut into it.
How to Stop White Smoke from Coming Out of the Air Fryer
Seeing white smoke puffing out of your air fryer can be a bit startling, but it's usually nothing to panic about. This almost always happens when you're cooking high-fat foods. Think bacon, fatty sausages, or even chicken wings. As the fat renders, it drips down onto the hot drawer below and starts to burn, which creates the smoke.
Luckily, there are a couple of clever tricks to stop this from happening.
Pro Tip: Before you start cooking, tuck a slice of bread under the basket (but on top of the bottom of the drawer). The bread does a fantastic job of soaking up all that dripping grease, preventing it from smoking. It also makes cleanup a breeze!
Another great trick is to add a little water—just a tablespoon or two—to the drawer under the basket. The water prevents the grease from getting hot enough to start smoking. And of course, keeping your air fryer clean is key, since old, caked-on grease is a prime suspect for smoking.
Your Air Frying Questions, Answered
Getting a new appliance always comes with a learning curve. Even with a handy air fryer cooking times chart, you're bound to have questions pop up. Things like preheating, or how to adapt that old family recipe you love. I've gathered the most common questions right here to give you clear, simple answers so you can start cooking like a pro.
Think of this as your go-to cheat sheet for those little moments of doubt in the kitchen.
Do I Really Need to Preheat My Air Fryer?
Honestly, while you can get away without it for some things, preheating for 3-5 minutes is a habit I highly recommend. It makes a huge difference for anything that needs that initial blast of intense heat to get crispy—think fresh-cut fries, chicken wings, or breaded mozzarella sticks. Preheating ensures the cooking starts the second the food hits the basket.
It's the same logic as preheating your big oven before you bake a cake. Some of the newer air fryer models do this for you automatically. If yours doesn't, just set your temperature, let it run for a few minutes while you prep your food, and you're good to go.
How Do I Convert Oven Recipes for My Air Fryer?
This is way easier than it sounds! The general rule of thumb that works for most recipes is to drop the oven temperature by 25°F and cut the cooking time by about 20-25%. That's it. This quick adjustment accounts for the fact that an air fryer is a smaller, more powerful convection environment.
Let's say a bag of frozen onion rings calls for 20 minutes at 400°F in a conventional oven. For your air fryer, you'd start at 375°F and check them after about 15 minutes. It's always a good idea to peek a few minutes early, especially the first time you try a recipe. You can always add a couple more minutes, but you can't un-burn something!
Pro tip: The first time you convert any recipe, check for doneness sooner than you think you need to. Every air fryer model has its own personality, and this is the best way to get to know yours and avoid a crispy catastrophe.
Is It Safe to Use Foil or Parchment Paper?
Yes, absolutely—as long as you do it the right way. Using foil or parchment paper can be a lifesaver for cleanup and for keeping delicate foods from sticking. But the number one rule of air frying is that air must circulate.
- Parchment Paper: The best option is the perforated parchment paper liners made just for air fryers. The holes are a game-changer, letting that hot air get underneath and crisp up the bottom of your food.
- Aluminum Foil: If you're using regular foil, don't just lay a sheet down and cover the whole bottom of the basket. Instead, you could make a small "boat" for a piece of salmon or a little tray that still leaves plenty of room for air to flow around the edges.
And here's the most important safety tip: Never, ever put loose foil or parchment in the air fryer while it's preheating. Without the weight of food to hold it down, the fan can suck it right up into the heating element, creating a serious fire risk.
Why Is My Food Dry Instead of Crispy?
This is a classic problem, and it almost always comes down to one of two culprits: you're overcooking it, or you skipped the oil. For fresh foods like potatoes or veggies, that little bit of oil is non-negotiable. Tossing them in just a teaspoon of oil helps the outside brown and get that perfect crunch while keeping the inside moist.
If you're making leaner foods or just reheating leftovers and they're coming out dry, you're probably just cooking them a bit too long or too hot. Try knocking the temperature down a little or shortening the time. The key is to check on it frequently toward the end of the cooking cycle until you dial in the sweet spot for your particular machine.
Here at airfryersnackideas.com, our whole goal is to help you see just how much fun you can have with your air fryer. For more recipes, handy tips, and creative snack ideas, come visit us at https://airfryersnackideas.com.